Mirror adjustment training in laser machine: Every laser cutting and engraving machine has three mirrors, which are required to be adjusted and increase the speed and quality efficiency in cutting. The placement of mirrors and lenses is shown in the figure below. Adjusting the mirror of the laser device means that if we apply glue on each mirror, when the pulse or laser is applied, the point of laser effects will be at the same point anywhere on the table (front right, front left, rear right, rear left).

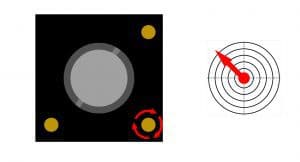
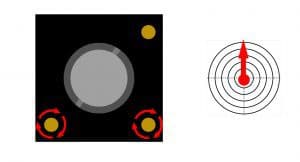
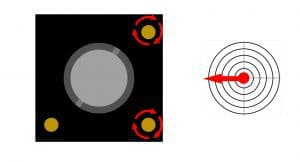
There are three screws behind each mirror. This screw pushes the mirror outward when you turn it clockwise to adjust the angle of the mirror. The photos below show the effect of adjusting each of the screws and we can see the expected results on the target. The screws can be used counterclockwise to adjust the mirror in the opposite direction.
 |  |  |
For settings, always start from the mirror of the laser device first!
First, we have to consider the point that the height distance of the tube should be adjusted so that it hits the mirror of the first laser device and all the point of effect of the laser is visible on the first mirror.
First step: adjusting the mirror one by two
First, we put a piece of glue in several layers on the mirror of the second laser machine, move the X-axis back to the machine and press the pulse or laser button on the panel, the laser effect appears on the glue. According to the function of the adjustment screws, we try to adjust the impact point to the center. Now we bring the x-axis to the front of the device and pulse it again. If the two effect points are exactly on top of each other, it shows that your first to second mirror is set.
If not, while the x-axis is in front of the device, we move the beam to the first impact point by adjusting the mirror adjustment screw 1.
When the burn effect of the far ray falls exactly on the burn effect of the near ray, we remove the adhesive and replace it with a new adhesive, then we repeat the first step, that is, the same step, until finally the effect point on the second mirror at the back and front of the device is exactly at the same point be.
The second step: adjusting the mirror two by three
This step is similar to the previous step, with the difference that in this step, instead of the axes of the device, we cut the head left and right. In this way, we first put several layers of adhesive paper on top of each other and bring it close to the second mirror.
We press the laser or pulse button without removing the sticky paper to the other side of the device, now we press the laser or pulse button again. If two effect points are on top of each other, we try to set the effect point in the center. Now move the head to the other side and pulse.
Now we will try to direct the second effect point towards the first effect point.

The first case: it is above or below the center in terms of height, in this case, its height should be adjusted by the height adjustment screw of the tube holder base so that the point of impact reaches the center.
The first case: it is above or below the center in terms of height, in this case, it should be adjusted by the height adjustment screw of the tube holder base, so that the impact point reaches the center.
The second case: if the effect point is on the left and right of the head.
A) In some devices, such as Shefang, we can loosen the carriage screw and move the head to bring the point to the center.
b) But in devices where it is not possible to move the head, we must adjust the mirror of the second laser device where the mirror is screwed to the X axis and move it backward or forward until the effect point reaches the center.
Method (b) is a bit difficult in adjusting the mirror of the laser device, and it should be done more carefully so that the second mirror only moves back and forth and does not move to the left or right.
Now, if the two points are on top of each other and in the center of the head, we must adjust the third mirror, that is, the mirror above the lens.
For this, first, if there is an air valve in the air pump, we reduce the air pressure, then under the head, where the air and The radiation comes out, we make a stamp and stick a piece of single-layer glue under it, then press the pulse or laser button, then remove the glue, the laser effect should be completely round in the center of the stamp, otherwise, the screws of its border should be adjusted do.

Note: Note: After adjusting the laser device mirror , the adjusting screw nuts must be tightened without moving the screws to adjust They do not collapse over time.


